作者:张鑫旭(@张鑫旭)
链接:http://www.zhangxinxu.com/wordpress/2016/04/css-writing-mode/
一、冉冉升起的writing-mode
writing-mode这个CSS属性,我们是不是很少见到,很少用到!我们往往称不常见的东西为“生僻”,就像是不常见的文字我们叫“生僻字”,因此不常见的CSS属性,我们可以叫做“生僻属性”,writing-mode给我们的感觉就是一个“生僻属性”,很弱,可有可无。
但是,实际上,我们都错了,大错特错,writing-mode很弱?卧槽,别开玩笑了,writing-mode可以说是CSS世界里面最逆天的CSS属性了,直接颠覆CSS世界的众多规则。
而writing-mode之所以给人“生僻”的感觉,是有原因的。
实际上writing-mode这个CSS属性在上古时代就诞生了,IE5.5浏览器就已经支持了:

那就奇怪了!writing-mode既然这么鸟,同时时间早,资格老,为啥一直沉寂了差不多20年呢?
那是因为,在很长一段时间里,FireFox, Chrome这些现代浏览器都不支持writing-mode,writing-mode基本上就是IE浏览器的私有产物,大家对IE一直没啥好感,对吧,爱屋及乌由此及彼,自然对writing-mode也不待见。
然而,就在我们被流行前端技术一叶蔽目的时候,各大现代浏览器纷纷对writing-mode实现了更加标准的支持(主要得益于FireFox浏览器的积极跟进),也就是说,不知什么时候起,writing-mode的兼容性已经不成问题了,加上该属性本身特性逆天,我去,我仿佛看到了一个冉冉升起的新星,不对,是新月,而且是圆月。
二、writing-mode的原本作用
和float属性有些类似,writing-mode原本设计的是控制内联元素的显示的(即所谓的文本布局-Text Layout)。因为在亚洲,尤其像中国这样的东亚国家,存在文字的排版不是水平式的,而是垂直的,例如中国的古诗古文。
因此,writing-mode就是用来实现文字可以竖着呈现的。
您可以狠狠地点击这里:CSS writing-mode与文字垂直排版demo(http://www.zhangxinxu.com/study/201604/writing-mode-text-vertical-layout.html)
截自IE11浏览器IE8模式:

writing-mode语法
writing-mode的语法学习相比其他CSS属性要高一些,因为我们需要记住两套不同的语法。一个是IE私有属性,第二个是CSS3规范属性。
先看下未来所需的CSS3语法:
/* 关键字值 */
writing–mode: horizontal–tb; /* 默认值 */
writing–mode: vertical–rl;
writing–mode: vertical–lr;
/* 全局值-关键字inherit IE8+,initial和unset IE13才支持 */
writing–mode: inherit;
writing–mode: initial;
writing–mode: unset;
各个关键字属性值的含义,我们透明名称就能知道其大概的意思,例如,默认值horizontal-tb表示,文本流是水平方向(horizontal)的,元素是从上往下(tb:top-bottom)堆叠的。
vertical-rl表示文本是垂直方向(vertical)展示,然后阅读的顺序是从右往左(rl:right-left),跟我们古诗的阅读顺序一致。
vertical-lr表示文本是垂直方向(vertical)展示,然后阅读的顺序还是默认的从左往右(lr:left-right),也就是仅仅是水平变垂直。
下面是各个值下的中英文表现对照(参考自MDN):

//zxx: 大家会发现英文字符横过来了,可以试试使用text-orientation:upright让其直立,IE不支持,FireFox, Chrome支持。
下面来看下老IE浏览器的语法,由于历史原因,显得相当的复杂,IE官方文档显示如下:
-ms-writing-mode: lr-tb | rl-tb | tb-rl | bt-rl | tb-lr | bt-lr | lr-bt | rl-bt | lr | rl | tb
根据自己的测试(非原生IE8,IE9),-ms-私有前缀是可缺省的,直接writing-mode所以IE浏览器都是支持的。-ms-writing-mode这种写法IE7浏览器是不支持的,但是官方有如下说明:
Windows Internet Explorer 7. The rl-tb, and bt-rl values are available to the -ms-writing-mode
就是说IE7的-ms-writing-mode可以使用rl-tb和bt-rl这两个值,但这和自己的测试不符,我觉得可能是原生IE7浏览器,但我没有原生IE7,没有进行过测试,因此,此说法(原生IE7支持)只是自己的推测。
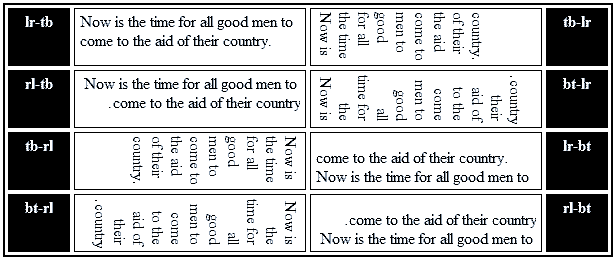
我扳指头数了数,IE浏览器下的关键字值多达11个,正好可以组个足球队,
lr-tb
IE7+浏览器支持。初始值。内容从左往右(left-right),从上往下(top-bottom)水平流动,以及下一行水平元素在上一行元素的下面,所有符号都是直立定位。大部分的书写系统都是使用这种布局。
rl-tb
IE7+浏览器支持。内容从右往左(right-left,从上往下(top-bottom)水平流动,以及下一行水平元素在上一行元素的下面,所有符号都是直立定位。这种布局适合从右往左书写的语言,例如阿拉伯语,希伯来语,塔安那文,和叙利亚语。
tb-rl
IE7+浏览器支持。内容从上往下(top-bottom),从右往左(right-left)垂直流动, 下一个垂直行定位于前一个垂直行的左边,全角符号直立定位,非全角符号(也可以被称作窄拉丁文或者窄假名符号)顺时针方向旋转90°。这种布局多见于东亚排版。
bt-rl
IE7+浏览器支持。内容从下往上(bottom-top),从右往左(right-left)垂直流动, 下一个垂直行定位于前一个垂直行的左边,全角符号直立定位,非全角符号(也可以被称作窄拉丁文或者窄假名符号)顺时针方向旋转90°。此布局多见于在东亚垂直排版从右往左的文本块上。
tb-lr
IE8+浏览器支持。 内容从上往下(top-bottom),从左往右(left-right)垂直流动。下一个垂直行在前一个的右边。
bt-lr
IE8+浏览器支持。 内容从下往上(bottom-top),从左往右(left-right)垂直流动。
lr-bt
IE8+浏览器支持。 内容从下往上(bottom-top),从左往右(left-right)水平流动。下一个水平行在前一行的上面。
rl-bt
IE8+浏览器支持。内容从下往上(bottom-top), 从右往左(right-left)水平流动。
lr
IE9+浏览器支持。在SVG和HTML元素上使用。等同于lr-tb.
rl
IE9+浏览器支持。在SVG和HTML元素上使用。等同于rl-tb.
tb
IE9+浏览器支持。在SVG和HTML元素上使用。等同于tb-rl.
各个属性值的表现如下(form微软官网)
一些说明:
- 相同的writing-mode属性值并不会累加,例如父子均设置了writing-mode:tb-rl,只会渲染一次,子元素并不会2次“旋转”。
- IE浏览器下,一个自身具有布局的元素(不是纯文本之类元素)如果writing-mode属性值和父元素不同,当子元素的布局流变化的时候,其父元素坐标系统的可用空间会被充分利用。左边文字太过术语,大家可能不懂,我解释下就是,IE浏览器下,当布局元素从水平变成垂直的时候(举个例子),你就想象为元素在垂直方向是100%自适应父元素高度的。所以,IE浏览器下(不包括IE13+),元素vertical流的时候会发现高度高的吓人,布局和其他现代浏览器不一样,就是这个原因。
- Chrome浏览器下目前还需要-webkit-私有前缀,虽然Chrome和Opera认识tb-rl等老的IE属性值,但是,仅仅是认识而已,根本不鸟,没有任何效果,聋子的耳朵——摆设!
需要关注的writing-mode属性值
从着眼于直接开发的角度而言,虽然IE支持多达11个私有的属性值,但是,我们需要关注的,也就那么几个,那究竟是哪几个呢?
如果你的项目需要兼容IE7,则只有关注这两个值就可以了:初始值lr-tb和tb-rl,对应于CSS3规范中的horizontal-tb和vertical-rl!其他9个属性值就让它们去过家家好了。
如果你的项目只需要兼容IE8+,恭喜你,你可以和CSS3规范属性完全对应上了,而且IE8下的writing-mode要比IE7强大的多。我们需要关注:初始值lr-tb, tb-rl以及tb-lr,分别对应于CSS3中的horizontal-tb, vertical-rl以及vertical-lr。
看上去复杂的属性是不是变得很简单了,重新整一个实战版:
writing–mode: lr–tb | tb–rl | tb–lr (IE8+);
writing–mode: horizontal–tb | vertical–rl | vertical–lr;
对,大家只要记住上面几个就可以了,enough! 因为所谓的垂直排版,实际web开发是很少很少遇到的。
有同学可能要疑问了,既然writing-mode实现文本垂直排版场景下,那还有什么学习的意义呢?
前面也提到了,虽然writing-mode创造的本意是文本布局,但是,其带来的文档流向的改变,不仅改变了我们多年来正常的CSS认知,同时可以巧妙实现很多意想不到的需求和效果。
三、writing-mode不经意改变了哪些规则?
writing-mode将页面默认的水平流改成了垂直流,颠覆了很多我们以往的认知,基于原本水平方向才适用的规则全部都可以在垂直方向适用!
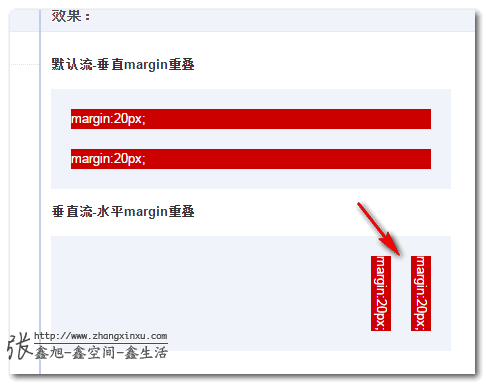
1. 水平方向也能margin重叠
W3C文档margin重叠之一:
The bottom margin of an in-flow block-level element always collapses with the top margin of its next in-flow block-level sibling, unless that sibling has clearance.
清清楚楚写的bottom margin和top margin会重叠;然而,这是CSS2文档中的描述,在CSS3的世界中,由于writing-mode的存在,这种说法就不严谨了,应该是对立流方向的margin值会发生重叠。换句话说,如果元素是默认的水平流,则垂直margin会重叠;如果元素是垂直流,则水平margin会重叠。
您眼见为实,您可以狠狠地点击这里:CSS writing-mode与margin水平重叠demo
结果:
2. 可以使用margin:auto实现垂直居中
我们应该都是的,传统的web流中,margin设置auto值的时候,只有水平方向才会居中,因为默认width是100%自适应的,auto才有计算值可依,而垂直方向,height没有任何设置的时候高度绝不会自动和父级高度一致,因此,auto没有计算空间,于是无法实现垂直居中。但是,在writing-mode的世界里,纵横规则已经改变,元素的行为表现发生了翻天覆地的变化。
我们先来看下,图片元素margin:auto实现垂直居中,您可以狠狠地点击这里:CSS writing-mode与图片margin:auto垂直居中demo(http://www.zhangxinxu.com/study/201604/writing-mode-vertical-image-margin-auto.html)其中图片:
img { display: block; margin–top: auto; margin–bottom: auto; }
FireFox浏览器下(P白省流量):

但是,在IE浏览器下,却没有垂直居中~~

纳尼?!难道IE不支持垂直流下的垂直居中?非也,根据鄙人的测试,也就是图片这类替换元素貌似不行,普通的block元素都是可以的。
您可以狠狠地点击这里:CSS writing-mode与普通block元素margin:auto垂直居中demo(http://www.zhangxinxu.com/study/201604/writing-mode-vertical-margin-auto.html)此时,不仅IE11 edge,甚至IE8浏览器也都垂直居中了!IE8浏览器下block元素的margin:auto居中
3. 可以使用text-align:center实现图片垂直居中
前面提过,auto无法实现IE浏览器下的图片垂直居中,如果我们非要让图片垂直居中,可以使用text-align:center,您可以狠狠地点击这里:CSS writing-mode与图片text-align:center垂直居中demo(http://www.zhangxinxu.com/study/201604/writing-mode-vertical-image-text-align-center.html)
结果,之前病恹恹的IE浏览器活了:
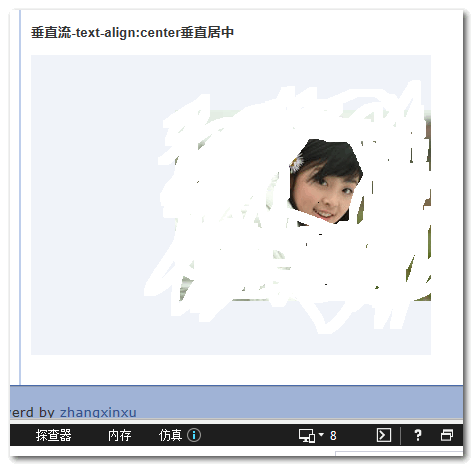
由于我们直接使用内联特性进行控制的,因此,IE7浏览器也是可以实现text-align:center下的图片垂直居中,但是,根据我在IE11↘IE7下的测试,writing-mode需要写在最后重置下(原生估计不会这样),因此,完整的writing-mode代码为:
.verticle–mode {
writing–mode: tb–rl;
–webkit–writing–mode: vertical–rl;
writing–mode: vertical–rl;
*writing–mode: tb–rl;
}
4. 可以使用text-indent实现文字下沉效果
这是真实项目例子,要增加一个按钮按下文字下沉的效果。如果你来实现,你会这么实现呢?行高控制?但默认文本就不居中(对于高度自适应的按钮,line-height下沉为了避免按钮高度变化,默认是不能完全居中的)。padding+height精确控制,又略烦。然而,在writing-mode垂直流下,我们又有了新思路,例如,直接使用text-indent实现垂直方向的控制,没想到吧,无需关心height高度padding间距大小,任何按钮都可以通用,因为text-indent不会影响元素原本的盒布局。
您可以狠狠地点击这里:CSS writing-mode与text-indent文字下沉效果demo(http://www.zhangxinxu.com/study/201604/writing-mode-text-indent-vertical-down.html)
包括IE7在内的浏览器都是支持的(同上最后要*writing-mode覆盖下)都是支持下沉的。
为什么有如此的实现呢?这要归功于中文,在垂直流排版的时候,中文是不会旋转的,还是直立的,也就是说,虽然我们肉眼看上去文字没什么变化,但是,布局流已经发生了变化,以前类似text-indent/letter-spacing等水平控制属性都作用在垂直方向了。
当然,我们这个例子比较巧的是按钮文字只有一个,要是按钮文字有多个,怕是就没这么轻松和绝妙了。
5. 可以实现全兼容的icon fonts图标的旋转效果
在老的IE浏览器下,我们要实现小图标的旋转效果是不是很烦?要使用IE的旋转或翻转滤镜(filter)什么的,具体可参见我之前的“CSS垂直翻转/水平翻转提高web页面资源重用性”以及“IE矩阵滤镜Matrix旋转与缩放及结合transform的拓展”一文。
现在我们有了writing-mode,我们就不要这么烦心了。
前面可能也注意到了,当writing-mode把文档变成垂直流的时候,我们的英文和数字符号是会“躺着”显示,也就是天然90°旋转了。此时,我们不妨脑洞大开一下,假如我们使用icon fonts技术让这些字符直接映射某个小图标,那岂不是松松实现小图标旋转了,关键在于,就算是千年杀的IE6,IE7浏览器也是支持的啊,这要比滤镜什么的简单多了!
眼见为实,您可以狠狠地点击这里:writing-mode实现icon fonts图标旋转效果demo(http://www.zhangxinxu.com/study/201604/writing-mode-font-face-icon-rotate.html)
就算是IE7浏览器,也是很给力的!

6. 充分利用高度的高度自适应布局
卧槽,不行了,内容太多了
往下的7,8,9,10一起都略了吧~~
总之,放开自己的大脑,理论上讲,有了writing-mode,我们能够做的事情比以前多了50%,就怕你想不到,不怕做不到。
四、writing-mode和direction的关系
上个月刚刚介绍了CSS direction属性,也是个好东西,具体参见“CSS direction属性简介与实际应用”,其可以改变文字的走向,那他和writing-mode是个什么关系呢?
writing-mode, direction, unicode-bidi(MDN文档)是CSS世界中3大可以改变文本布局流向的属性。其中direction, unicode-bidi属于近亲,经常在一起使用,也是唯一两个不受CSS3 all属性影响的CSS属性,基本上就是和内联元素一起使用使用,且据说貌似为阿拉伯文字设计。
乍一看,writing-mode似乎包含了direction, unicode-bidi某些功能和行为,例如vertical-rl的rl和direction的rtl值有相似之处,都是从右往左。然而,实际上,两者是没有交集的。因为vertical-rl此时的文档流为垂直方向,rl表示水平方向,此时再设置direction:rtl,实际上值rtl改变的是垂直方向的内联元素的文本方向,一横一纵,没有交集。而且writing-mode可以对块状元素产生影响,直接改变了CSS世界的纵横规则,要比direction强大和鬼畜的多。且据说貌似为东亚文字设计。
然而,CSS的奇妙就在于,某些特性当初可能就是问了某些图文排版设计,但是,我们可以利用其带来的特性,发挥自己的创造力,实现其他很多意想不到的效果。所以,上面出现的三剑客都是非常好的资源。
五、writing-mode和*-start属性的流机制
CSS3中出现了诸多*-start/*-end属性(亦称为CSS逻辑属性),例如:margin-start/margin-end, border-start/border-end, padding-start/padding-end, 以及text-align:start/text-align:end声明。
下面问题来了,为什么会蹦出这么多*-start/*-end鬼?
那是因为现代浏览器加强了对流的支持,包括老江湖direction,以及最近年月跟进的writing-mode。
在很久以前,我们的认知里,网页布局就一种流向,就是从左往右,从上往下,因此,我们使用margin-left/margin-right没有任何问题。但是,如果我们流是可以变化的,例如,一张图片距离左边缘20像素,我们希望其文档流是从右往左,同时距离右侧是20像素,怎么办?
此时,margin-left:20px在图片direction变化后,就无效了;但是,margin-start就不会有此问题,所谓start, 指的是文档流开始的方向,换句话说,如果页面是默认的文档流,则margin-start等同于margin-left,如果是水平从右往左文档流,则margin-start等同于margin-right。margin-end也是类似的。

webkit内核的浏览器还支持*-before和*-end,默认流下的margin-before近似于margin-top,margin-after近似于margin-bottom,然而,规范貌似没提及,FireFox也没支持,*-before和*-after出场的机会并不多,为什么呢?因为实际上,配合writing-mode,*-start/*-end已经可以满足我们对逻辑位置的需求了,水平和垂直都可以控制,对立方向适用老的*-top/*-bottom.
例如,我们设置writing-mode值为vertical-rl,此时margin-start等同于margin-top,如果此时margin-start,margin-top同时存在,会遵循权重和后来居上原则进行相互的覆盖。
可以看到,场景不同,margin-start的作用也不能,能上能下,能左能右简直在世百变星君。
关于*-start/*-end以后有机会会具体展开论述,这里就先点到为止,大家估计目前也不会在实际项目中使用。
 ): We will read 4 articles